
The holiday season is over, Christmas has been torn down, and a new year has begun. It’s time to figure out what to do with that reel of Neopixels that I bought last year. They made a fun little window decoration, but I don’t want to leave them there year round. I have it in my head to use some of them to make custom lighting for my sons’ bunk beds, and the boys are keen on this idea, too. After a trip to Radio Shack, we have all the parts we need.
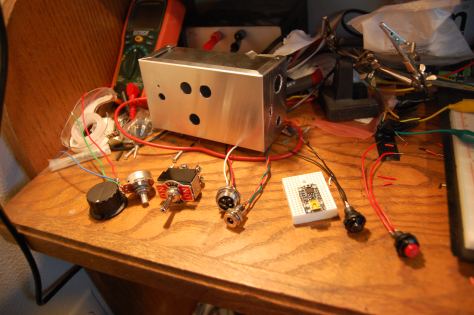
For each of two control boxes, one each of:
- Enclosure
- 50k linear pot
- 1/4″ shaft knob
- Red momentary switch
- Black momentary switch
- 2.1mm DC jack
- 4-pin mic jack (panel mount)
- 4-pin mic plug (in-line)
And I already had some other bits and pieces laying about:
- DPDT center-off toggle switch
- 5v power supply
- mini breadboard
- microcontroller
NB: A Trinket is pictured, but I decided that I want more inputs, I built these using Pro Minis.


I turned out to have drilled the hole for the pot’s little stabilizing pin on the wrong side, which meant that I had also wired it backwards, but it all worked out in the end. It’s not the kind of precision-routed beauty that my father taught me to love, but it’s not a complete rat’s nest, either.
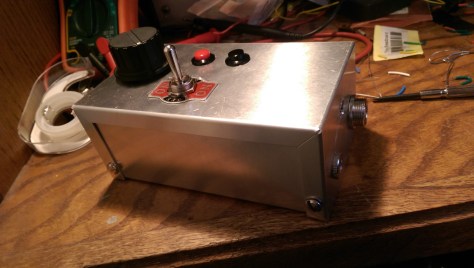
Assembly is straightforward. The plastic enclosure took 1d4 of damage at the hands of the drill press, but a little superglue fixed it right up. The behaviors will be pretty simple: use the toggle switch to select between two modes (solid color and disco mode), use the knob and buttons in each mode to adjust the settings for that mode. In solid color mode, pushing the red button will let you use the knob to adjust the color, and pushing the black button will let you adjust the brightness. In disco mode, pressing the red button will cycle through display modes (ripped straight from Adafruit’s strandtest sketch) and the knob will adjust the color where appropriate. The schematic couldn’t be simpler.
![]()
The only tricky thing is the software: I want to use the various strandtest behaviors (color wipe, theater chase, rainbow cycle, etc.), but I don’t want to strand the user interface for the entire length of a behavior cycle. For example, theaterChase() looks like this:
//Theatre-style crawling lights.
void theaterChase(uint32_t c, uint8_t wait) {
  //do 10 cycles of chasing
  for (int j=0; j<10; j++) {
    for (int q=0; q < 3; q++) {
      for (int i=0; i < strip.numPixels(); i=i+3) {
        //turn every third pixel on
        strip.setPixelColor(i+q, c);
      }
      strip.show();

      delay(wait);

      for (int i=0; i < strip.numPixels(); i=i+3) {
        //turn every third pixel off
        strip.setPixelColor(i+q, 0);
      }
    }
  }
}
https://github.com/adafruit/Adafruit_NeoPixel/blob/master/examples/strandtest/strandtest.ino
The value of “wait” is 50, which means that this function will take approximately 50 * 3 * 10 = 1500ms = 1.5 seconds to run. Unless I make my UI interrupt-driven (which is not my usual way of building UIs in Arduino), this will cause up to a 1.5 second delay between pressing a button and seeing any result. For some of the other modes, it’s worse. theaterChaseRainbow() would take more like 38 seconds. Clearly, this will not do.
Enter the global state rewrite! Now, theaterChase() looks like this:
//Theatre-style crawling lights.
void theaterChase() {
  if (i == 0) {
    for (i=0; i < strip.numPixels(); i=i+3) {
      //turn every third pixel on
      strip.setPixelColor(i+q, getColor());
    }
    strip.show();
    delay(wait);
  } else {
    for (h=0; h = 3) {
      q = 0;
      j += 1;
      if (j >= 10) {
        j = 0;
      }
    }
  }
}
It only calls delay(wait) once peer loop(). All of the local state has become global state, so not only do I get to do other work while I’m in the middle of a theater chase cycle, I can also modify its behavior mid-run, changing the color of the color wipe or theater chase behaviors.
After rewriting all of the modes this way, I’m ready to test.
A handful of zip ties later and I have some delighted children!


