

A few years ago, I posted about the Seahawks “12” sign that I keep in my window during football season. It was a piece of foam-core board with a strip of Neopixels punched through in the rough shape of a 12.

It is not without its charm, but I needed an upgrade. I have had great luck making fun things out of “RGB LED matrix” panels. These are not built from addressable LEDs like the Neopixel lights in my old 12 sign, but are bare RGB LEDs with just enough circuitry to power and address them. In order to get a persistent image, you have to write to them constantly. Nick Poole did a great write-up on these for Sparkfun.

These panels are usually available from Adafruit or Sparkfun, and they come in a small range of sizes and pitches (pitch is the spacing between the lights). The apple is drawn on a 32×32 6mm pitch panel, about 8″ on a side.

This is the back of a 32×32 4mm pitch panel (5″ x 5″). These panels all have two 16-pin connectors, one input and one output. The primary use case for them is as elements of much larger displays, and they are daisy chainable. You must power each panel individually via the hefty 4-pin connector in the middle. They usually come with a ribbon cable and a power cable (but not a power supply).
I’m driving that Apple logo display with an Arduino Pro Mini. I’m using an Arduino and not a Raspberry Pi because getting a stable image out of these requires consistent timing, and a Pi is just not good at that. I have successfully driven a panel like this from a Pi, but the image was always shaky and flickering. Enter the Adafruit RGB Matrix HAT! This handy little board comes as a kit, which just means that you get to solder the headers on yourself.
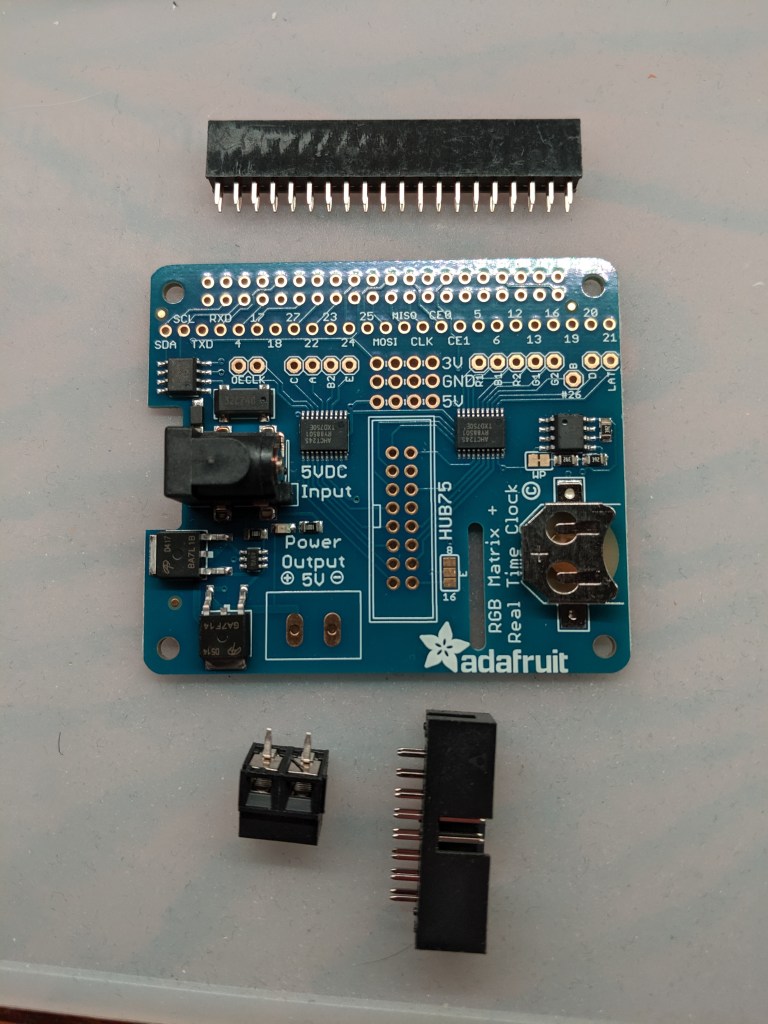
The long connector along the back plugs right into the pins on the Pi, the 16-pin connector in the middle is for connecting to the panel, and the screw terminals output 5v. There’s a 2.1mm a barrel connector on the left for 5v in (I recommend a high-amperage supply, at least 2A, preferably more), and there’s a battery slot on the right in case you care about having a persistent real-time clock. In my applications, I don’t need this. The hat will power the Pi, which is nice, and you can use the screw terminals to send power to the panel.
Using these tools, I can build a really neat 12 sign. Driving it with a Raspberry Pi means that I get the full capabilities of a Linux environment to help me decide what to draw. Being able to daisy chain panels lets me build a bigger display. For this project, I chose two 64×32 5mm pitch panels from Adafruit. I have mated them along their long edges, forming an approximately 1′ x 1′ square. I connected them using a 30cm ribbon cable I bought from Amazon.

To join the panels together, I first made a template by laying the panels out how I wanted them and using paper and pencil to make a rubbing of the holes. I used this template to drill out holes in some strips of scrap plastic and then screwed these to the panels (the panels have tapped holes for screw-in feet around their edges). I have a Raspberry Pi + Adafruit’s RGB Matrix HAT connected to the bottom panel and the bottom panel chained up to the top panel. Both panels are powered from the HAT, and the whole thing is powered by an Adafruit 5v 10A supply. I can get this system to pull up to about 40W (8A at 5v) if I turn all the pixels on brightest white. Typical draw is more like 16W.

The software is all python. It takes a rich set of CLI options to define what goes on the panel, and it also exposes an API endpoint and a simple web interface. These are plaintext, unauthenticated endpoints, please do not expose them to the Internet. It defaults to rendering text, but it can also display an image file (I have tested JPG and PNG). Display device options include a single 32×32 panel, a daisy-chained square of 64×32 panels, or an Adafruit Dotstar disc.
One interesting issue I ran into was that I could only convince the Adafruit rgbmatrix library to address the two panels as though they were arranged end-to-end, 128×32 instead of 64×64. I compensate for this by transforming my 64×64 square image to 128×32 at the last minute.
The main executable is “run_sign”, and to run a 64×64 display composed of two 64×32 panels, the call looks like this:
python3 run_sign --decompose --rows 64 --cols 64
The command line arguments represent a subset of the functionality represented by the API.
$ curl localhost:1212/help

Hawks API usage:
  /api/get                Return current settings
  /api/get/presets        Return a list of presets
  /api/set/key/value      Modify a current setting
  /api/do/image           Returns a PNG of the current image

Settings:
  bgcolor                 Background color when rendering
                           text
  outercolor              Outer color of rendered text
  innercolor              Inner color of rendered text
  font                    Font to use when rendering text
  rows                    Image height
  cols                    Image width
  decompose               Display is a chain of two 64x32
                           RGB LED matrices arranged to form
                           a big square
  text                    Text to render (if file is "none")
  thickness               Thickness of outercolor border
                           around text
  animation               Options are "waving" or "none"
  amplitude               Amplitude of waving animation
  fps                     FPS of waving animation
  period                  Period of waving animation
  file                    Image file to display (or "none")
  file_path               Directory in which to find files
  margin                  Margin of background color around
                           text
  brightness              Image brighness, full bright = 255
  disc                    Display is a 255-element DotStar
                           disc
  transpose               PIL transpose operations are
                           supported
  rotate                  Rotation in degrees
  mock                    Display is mock rgbmatrix
Calling run_sign with --mock will use mocked implementations of the RGBMatrix and RGBMatrixOptions modules. The mock RGBMatrix will draw the image to your terminal, using two spaces to represent each pixel. This is handy for developing code for an rgbmatrix while not physically near an rgbmatrix. And even when you ARE near your rgbmatrix, you do not have to disturb your sign to test new settings or develop new features.

Calling run_sign with --disc will set the display to an Adafruit Dotstar disc, assumed to be accessible via SPI. These are relatively low-res, but super beautiful.

You can find the code on Github: https://github.com/erickhammersmark/hawks
